Quest Passthrough
Hello Coders!👾
The advancements in AR technology have opened up new possibilities for mixed reality experiences, and today, I’d like to share insights on a feature that stands out in this evolving space. The introduction of AR plane and mesh detection on the Meta Quest 3, particularly with the advent of color passthrough on Quest 3 and Meta Quest Pro (and maybe others, I have not tested those), marks a significant leap in how we perceive and interact with our environment. We’re now able to harness these capabilities through Wonderland Engine as well, setting the stage for innovative AR/Mixed Reality applications that are not just limited to games, but extend to various realms of immersive experiences. Let’s explore how these technologies are shaping the future of virtual interaction. First I will explain how everything works on the Quest. Then I’ll show you how you can set this up in Wonderland Engine.
Introducing Passthrough Mode
Ever wondered how cool it would be if you could blend the real world around you with the fantastical realms of VR? That’s where Passthrough mode comes into play. This lets you see your physical surroundings directly in your Meta Quest headset.
Imagine this: one minute you’re sitting in your cozy living room, and the next, you’re dodging fireballs or planting virtual flowers on your coffee table – all in vivid color on the Meta Quest Pro and Quest 3 and grayscale on Meta Quest 2.
To get this started, we use some simple code to kick off an ‘immersive-ar’ session. Here’s what that looks like under the hood:
navigator.xr.requestSession("immersive-ar").then((session) => {
  xrSession = session;
});
Make sure to check if it is available first:
navigator.xr.isSessionSupported('immersive-ar').then((supported) => {
  if (!supported) { return; }
  // if you get here AR is supported.
}
And just like that, you’re ready to experience the blend of digital and physical worlds.
If you’ve ever looked at how to enter an immersive VR mode in WebXR, this code might seem familiar. And that is correct! It’s almost the same, except to get into VR you use immersive-vr instead of immersive-ar to enter AR mode.
Enabling Plane and Mesh Detection
Before diving into the complexities of mesh detection, it’s essential to establish the foundation on which it operates: plane detection. This feature allows the virtual environment to become aware of physical objects and surfaces in the user’s space, such as desks and couches. These are then represented in the virtual world as planes - flat shapes that are assigned a position within the world.
Setting up Your Environment
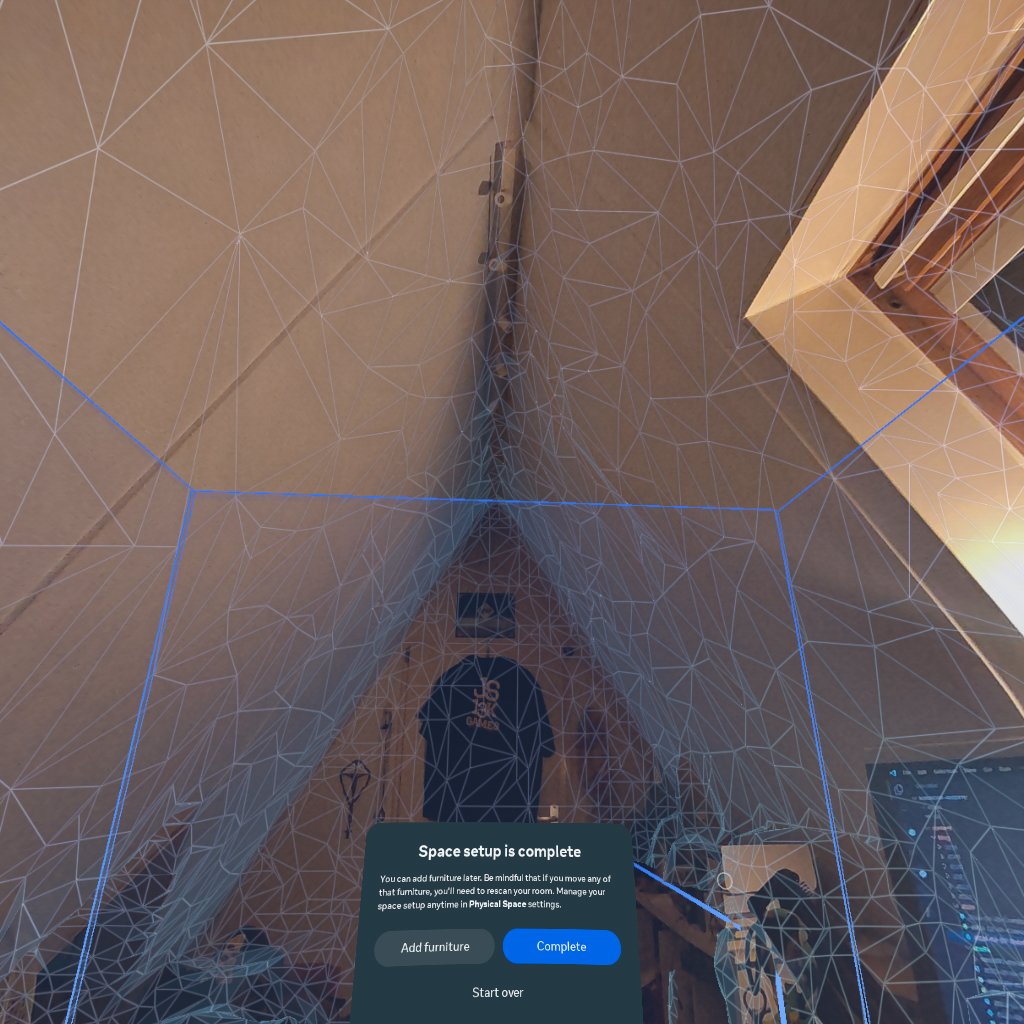
To make use of plane detection, it’s necessary to define your working space within the VR device settings. This is typically done through the boundary setup process, which can be accessed via:
Settings > Physical Space > Space setup
During this setup, you can also specify the location and dimensions of various objects and furniture pieces in your room.
Requesting Plane Detection and Mesh Detection Features
When initiating an AR session, you must explicitly request the plane-detection and the mesh-detection features. This is accomplished through the session request call as follows:
const session = await navigator.xr.requestSession("immersive-ar", {
  requiredFeatures: ["plane-detection", "mesh-detection"]
});
By passing the plane-detection and the mesh-detection feature descriptors, you prompt the browser to seek the user’s permission to access pre-defined room settings and, upon approval, incorporate this data into the session. To work with plane or mesh detection, you need to make sure your boundaries are activated. I tend to turn them off while developing.
Working with Detected Planes
Once the plane detection feature is active, the XRSession will include a new detectedPlanes array. Each entry in this array, an XRPlane, provides both a position in the world and a polygon shape, typically horizontal or vertical rectangles on Meta Quest headsets.
These detected planes can serve various purposes:
- Hit testing for user interaction
- Placing virtual objects on real-world surfaces
- Occlusion of virtual objects by physical planes
Since not all users configure their guardian space setup, a convenient method called initiateRoomCapture has been introduced to the XRSession. This function can prompt the guardian space setup directly from an immersive session, which is particularly useful if the detectedPlanes array is empty.
If your update loop is running and you’re checking if there are detected planes or meshes and these stay empty, you can choose to call initiateRoomCapture.
xrSession.initiateRoomCapture();
You should wait for a few seconds after the session creation to confirm the absence of planes before triggering the setup. Note that initiateRoomCapture can only be invoked once per session.
With plane detection properly set up, you’re now equipped to tackle the exciting challenge of mesh detection and create immersive experiences that blend the physical and virtual worlds seamlessly.
Passthrough in Wonderland
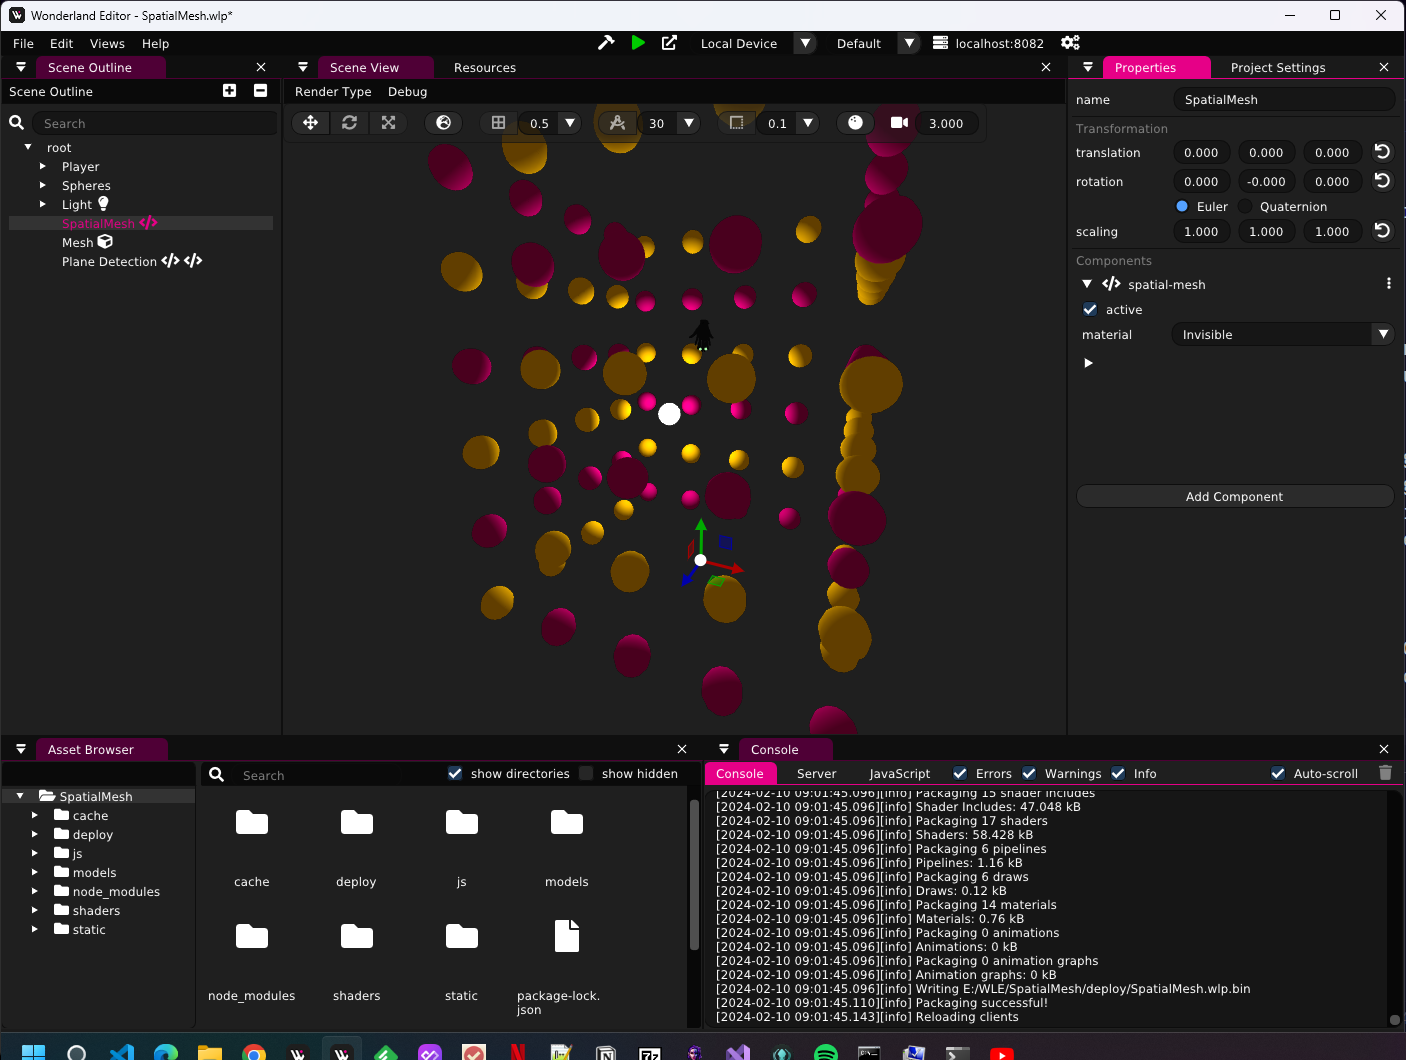
Now, let’s see how we can set this up in the Wonderland Editor. First things first, we need to make sure our game canvas is transparent so that our virtual creations can dance over the real-world backdrop. This can be done by setting the background color in the editor.
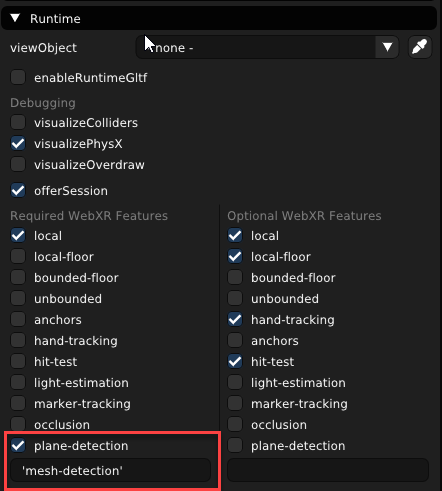
To bring our AR to life on the Quest 3, we had to add 'mesh-detection' to the list of WebXR features. At the moment of writing this option is not in the default list of features, but luckily they got us covered here: you can add it to the list yourself. Make sure to add it including the single quotes!
You don’t need to modify the index.js file yourself to add the required features, this is taken care of by Wonderland Engine.
✨ Crafting a Spatial Mesh Component
I have created a TypeScript component to demonstrate how to visualize the spatial mesh. – think of it as giving shape to invisible forces around us. It’s rather long so I have placed the full component at the end of the post, but we’ll go over the inner workings.
This script creates a mesh based on the room’s layout. A mesh that interacts with your virtual experiences. moving around in a space that mirrors your own!
The update method is a critical part of the SpatialMesh component, as it drives the integration of the physical environment into the virtual space and makes sure it updates every frame. Let’s delve deeper into how this method works:
Checking XR Presence
update(dt: number) {
  const xr = this.engine.xr;
  if (!xr) {
    return; // We're not in XR, so don't do anything.
  }
At the start, the method checks if the XR session is active. If not, it exits early, as there’s no need to process spatial meshes outside of an XR context.
Retrieving Frame and Reference Space
const frame = xr.frame;
const referenceSpace = xr.currentReferenceSpace;
The current frame and reference space from the XR session are retrieved. These are essential for understanding the user’s position and orientation within the physical space.
Handling Detected Meshes
const detectedMeshes = xr.frame.detectedMeshes;
The method then gets the set of detected meshes from the current XR frame. This might be undefined.
Looping Over Detected Meshes
detectedMeshes?.forEach((mesh: XRMesh) => {
    // ... Code for processing each detected mesh ...
});
For each detected mesh, the method proceeds to either update an existing geometry or create a new one if it doesn’t exist yet.
const meshPose = frame.getPose(mesh.meshSpace, referenceSpace);
For each XRMesh in the detectedMeshes set, the method acquires the mesh’s pose relative to the current reference space. The pose includes information about the position and orientation of the mesh within the user’s physical environment, which is crucial for accurately placing the mesh in the virtual space.
Determining Geometry Existence and Update Requirement
let geometry;
if (this.roomMeshes.has(mesh)) {
    // ...
    const meshContext = this.roomMeshes.get(mesh)!;
    if (meshContext.timestamp < mesh.lastChangedTime) {
        meshContext.timestamp = mesh.lastChangedTime;
        geometry = meshContext.mesh;
        const meshComponent = geometry.getComponent(MeshComponent)?.mesh!;
        this.updateGeometry(meshComponent, mesh.vertices, mesh.indices);
    }
}
The method then checks if a mesh corresponding to the XRMesh is already tracked in the room meshes map. If it is, the method compares the stored timestamp in the mesh context with the lastChangedTime of the XRMesh.
If the XRMesh has been updated since the last frame (lastChangedTime is greater than the stored timestamp), it proceeds to update the existing geometry. This is done by retrieving the MeshComponent from the geometry and then calling updateGeometry with the latest vertices and indices from the XRMesh.
Handling New Meshes
else {
    // ...
    geometry = this.createGeometry(mesh.vertices, mesh.indices);
    const meshContext: MeshContext = {
        id: this.meshId,
        timestamp: mesh.lastChangedTime,
        mesh: geometry,
    };
    this.roomMeshes.set(mesh, meshContext);
    this.meshId++;
}
If there is no existing mesh in the room meshes map for the XRMesh, it indicates that this is a new spatial mesh detected by the AR system. The method then calls createGeometry with the mesh’s vertices and indices, which creates a new Object3D with a MeshComponent and its associated mesh.
A new MeshContext is created with a unique id, the lastChangedTime of the XRMesh, and the newly created geometry. This context is then added to the room meshes map, ensuring that the component will keep track of the mesh for future updates.
Positioning and Orienting Meshes in Virtual Space
if (meshPose && geometry) {
    this.setXRRigidTransformLocal(geometry, meshPose?.transform!);
}
Finally, provided that a valid meshPose and geometry are obtained, the method uses setXRRigidTransformLocal to apply the pose to the Object3D. This function sets the position and rotation of the virtual mesh to match the physical spatial mesh’s pose, effectively merging the physical and virtual environments.
After ensuring the geometry is current, the method applies the mesh’s pose to the corresponding Object3D. This step aligns the virtual representation with the physical position and orientation of the actual mesh in the real world.
By the end of the update method, the SpatialMesh component ensures that the virtual scene reflects the current state of the user’s environment in real-time, providing an accurate and immersive AR experience.
Geometry Update and Creation
private updateGeometry(meshComponent: Mesh,
    vertices: Float32Array,
    indices: Uint32Array)
    // ...  code that update mesh geometry ...
);

private createGeometry(vertices: Float32Array, indices: UInt32Array): Object3D {
    // ... Code that creates a new mesh geometry ...
}
These methods are responsible for updating existing mesh geometries with new data and creating new mesh geometries from spatial mesh vertex and index data. The createGeometry method also associates the geometry with a MeshComponent and applies the material defined in the component’s properties.
Position and Rotation Setting
setXRRigidTransformLocal(o: Object3D, transform: XRRigidTransform) {
    // ... Code that sets the position and rotation of an Object3D ...
}
The setXRRigidTransformLocal method applies an XRRigidTransform to an Object3D, effectively positioning and rotating the mesh in the virtual world to match its physical counterpart in the real world.
In summary, the Spatial Mesh Visualization component integrates physical space into a virtual environment by creating, updating, and positioning 3D meshes based on data provided by AR devices. The component handles the complexities of mesh manipulation, allowing developers to focus on creating immersive AR experiences.
👋 Until Next Time!
If you’d like to get a complete example, head over to my GitHub and grab it from there. The example also has a shader in there that can be used for occlusion!
Keep those VR headsets charged and your imaginations wild – because together, we’re crafting a world where reality and fantasy are just two sides of the same coin.
Stay tuned, stay awesome, and remember: in our community , every voice matters and every idea sparks new magic.
Happy Coding! 🚀
—— 8< ————————————————————-
Spatial Mesh Component
import {
  Component,
  Material,
  Mesh,
  MeshAttribute,
  MeshComponent,
  MeshIndexType,
  Object3D,
  PhysXComponent,
  Shape,
} from "@wonderlandengine/api";
import { property } from "@wonderlandengine/api/decorators.js";

const tempVec = new Float32Array(3);
const tempQuat = new Float32Array(4);
type MeshContext = {
  id: number;
  timestamp: number;
  mesh: Object3D;
};

export class SpatialMesh extends Component {
  static TypeName = "spatial-mesh";

  @property.material()
  material?: Material;

  private roomMeshes = new Map<XRMesh, MeshContext>();
  private meshId = 0;

  update(dt: number) {
    const xr = this.engine.xr;
    if (!xr) return;
    const frame = xr.frame;
    const referenceSpace = xr.currentReferenceSpace;
    const detectedMeshes = xr.frame.detectedMeshes;
    detectedMeshes?.forEach((mesh: XRMesh) => {
      const meshPose = frame.getPose(mesh.meshSpace, referenceSpace);
      let geometry;
      if (this.roomMeshes.has(mesh)) {
        // // may have been updated:
        const meshContext = this.roomMeshes.get(mesh)!;
        // meshMesh = meshContext.mesh;
        // wireframeMesh = meshContext.wireframe;
        if (meshContext.timestamp < mesh.lastChangedTime) {
          //   // the mesh was updated!
          meshContext.timestamp = mesh.lastChangedTime;
          geometry = meshContext.mesh;
          const meshComponent = geometry.getComponent(MeshComponent)?.mesh!;
          this.updateGeometry(meshComponent, mesh.vertices, mesh.indices);
        }
      } else {
        // Create geometry:
        geometry = this.createGeometry(mesh.vertices, mesh.indices);
        const meshContext: MeshContext = {
          id: this.meshId,
          timestamp: mesh.lastChangedTime,
          mesh: geometry,
        };
        this.roomMeshes.set(mesh, meshContext);
        this.meshId++;
      }
      if (meshPose && geometry) {
        this.setXRRigidTransformLocal(geometry, meshPose?.transform!);
      }
    });
  }

  private updateGeometry(
    meshComponent: Mesh,
    vertices: Float32Array,
    indices: Uint32Array
    ) {
    meshComponent.indexData?.set(indices);
    const positions = meshComponent.attribute(MeshAttribute.Position);
    let v = 0;
    for (let i = 0; i < vertices.length / 3; i++) {
      positions?.set(i, [vertices[v], vertices[v + 1], vertices[v + 2]]);
      v += 3;
    }
  }

  private createGeometry(
    vertices: Float32Array,
    indices: Uint32Array
  ): Object3D {
    const meshObj = this.engine.scene.addObject();
    const meshComp = meshObj.addComponent(MeshComponent)!;
    meshComp.material = this.material;
    const mesh = new Mesh(this.engine, {
      vertexCount: vertices.length / 3,
      indexData: indices,
      indexType: MeshIndexType.UnsignedInt,
    });

    this.updateGeometry(mesh, vertices, indices);

    meshComp.mesh = mesh;
    return meshObj;
  }

  setXRRigidTransformLocal(o: Object3D, transform: XRRigidTransform) {
    const r = transform.orientation;
    tempQuat[0] = r.x;
    tempQuat[1] = r.y;
    tempQuat[2] = r.z;
    tempQuat[3] = r.w;

    const t = transform.position;
    tempVec[0] = t.x;
    tempVec[1] = t.y;
    tempVec[2] = t.z;

    o.resetPositionRotation();
    o.setTransformWorld(tempQuat);
    o.setPositionWorld(tempVec);
  }
}


