VR Controllers with Unity's XR Interaction Toolkit, Part 2
In the last tutorial I explained how to set up models to use as the hand visualization using Unity’s Interaction Toolkit. Today, I want to add a bit of animation to the hands. While working on this I ran into an issue with the hand from the previous post. It turned out that, although they seemed to have been rigged, the rig didn’t work. I could not animate the fingers to make it so the hand became a fist. With the cyber sales going on in the Unity asset store I finally picked up the vr hand models mega pack which was on my wishlist for quite some time. So, for the rest of the tutorial I’ll be using a hand from this pack (but still any other, correctly, rigged hand will work).
Create the controller states
First, we need to have 2 animation states per hand: an open hand, and a fist. If your model doesn’t come with these you’ll have to tweak and fiddle with the hand a bit to add an animation of a single frame with all the fingers curled into a fist. The pack I used came with a whole bunch of different hand states, so I used those.
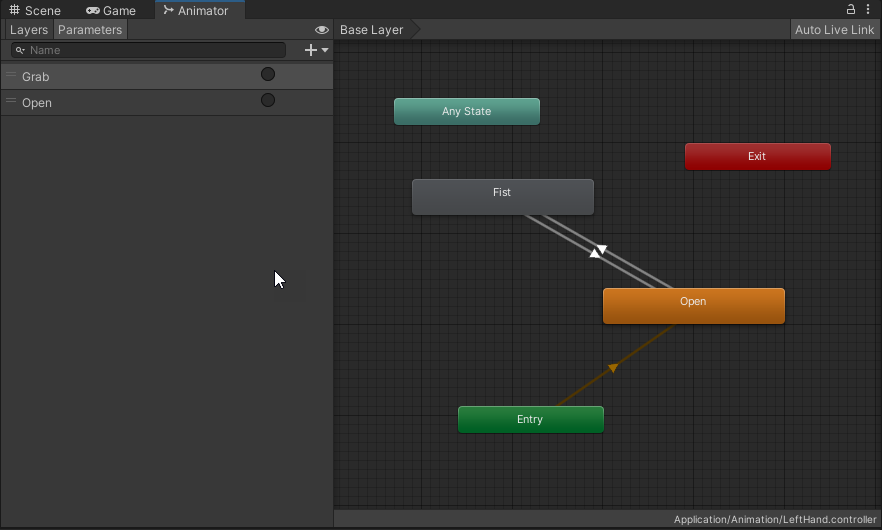
Next, we create an animation controller, open it in the Animator window and add the two animations to that. I’ve renamed one to ‘Fist’ and one to ‘Open’. I’ve set the ‘Open’ state to the default and added two transitions back and forth between ‘Fist’ and ‘Open’.
To make the interaction toolkit understand all of this, we need to add two trigger parameters by pressing the little + on the ‘Parameters’ tab of the Animator window.
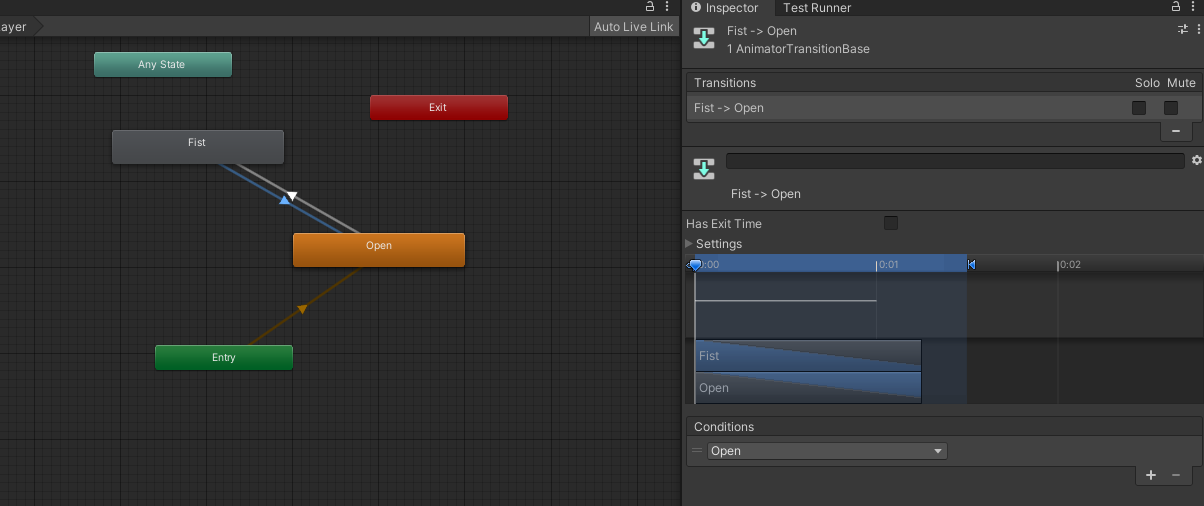
Now to have the transitions work on the triggers, select a transition and set the condition of the trigger to ‘Open’ on the transition to the ‘Open’ state and select the ‘Grab’ trigger on the transition going to the ‘Fist’ state.
That’s it for the first hand. I’ve done it all again for the second hand. I don’t know if there’s an easier way. Just doing it again seemed to be the least complex.
Also, make sure to add an Animator script to the hand prefabs and add the controllers we created to them. Otherwise, it won’t work, #BTDT.
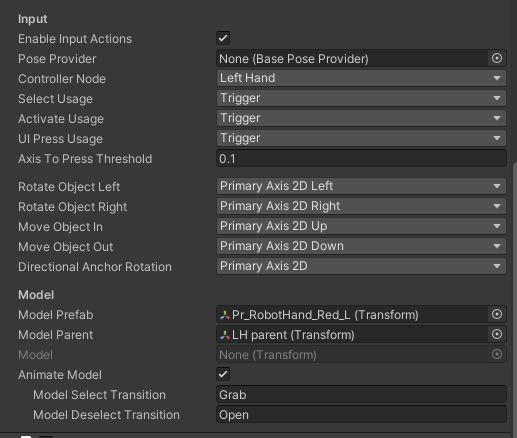
The last part of the puzzle is the let the controller scripts know that we want this. To do this, select the left hand controller below the ‘XR Origin’ in the scene and find the ‘Animate Model’ section. Enable this and add the two names of the triggers we created earlier to this: ‘Grab’ for the select transition and ‘Open’ for the deselect transition.
When you run the application now you should see the controllers in the place of your hands, and when you grab the controllers you should see the hands close.
It might be all correct now, or things might be off. Like they were in my case. The rotation was off and the speed was weird.
Extra to make to feel better
If the rotation and location are off, you can add an extra gameobject (I’ve named them LH Parent and RH Parent) as a child of the LeftHand Controller and the RightHand Controller. These will become the parent of the hands, meaning you can use these to tweak the transform a bit. You’ll need to go back and forth into VR and back to Unity to get these right for your situation. Make sure to drag the parent to the ‘Model Parent’ property of the XR Controller scripts.
In my case, I had to change the X-rotation to 90 and move the Y-position to 0.07.
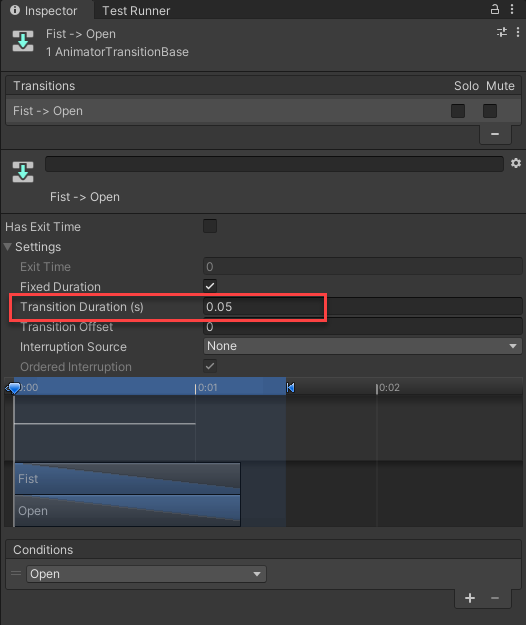
Another thing I’ve tweaked is the duration of the transitions between open and fist. This felt way too slow at first. After some fiddling with the values, I’ve settled on a transition duration of 0.05. You can find this setting on the transitions in the animation controllers.


